

How to Make a Bed Professionally for a Fluffy, Layered Look
A fluffy, hotel-style bed depends less on piling on layers than on smoothing the foundations and getting the folds right. Learning how to make a bed professionally starts with a well-fitted sheet, followed by a flat sheet tucked into neat hospital corners, an evenly spread duvet folded back at the top and plumped pillows arranged in balance. A bed skirt can complete the look by concealing the frame beneath.
Even beautiful bedding can look untidy if it’s twisted, creased or out of proportion, so the order of each step matters. This guide walks you through the process, from preparing the mattress and securing the sheets to layering blankets, shaping a fuller duvet and placing pillows for a considered finish. You’ll also learn how to adapt the arrangement to your room and bedding, so the result feels inviting and polished rather than overdone.
Key Takeaways
- Choose pillow sizes and an arrangement that suit your bed, then plump and position them for a balanced finish.
- Smooth the sheet over the mattress and use hospital corners to keep the foot of the bed neat and secure.
- Spread the duvet evenly, then fold it back with care to create a fuller, more inviting shape.
- Layer a top sheet, blanket or bedspread to add texture, keeping the folds aligned and the arrangement uncluttered.
- Fit a bed skirt around the frame before replacing the mattress to conceal the space beneath the bed.
Arranging sleeping and decorative pillows
Start with the sleeping pillows, then add decorative layers that suit the bed’s width and bedding pattern. A restrained arrangement keeps the display attractive and the pillows practical to use.
For a visual demonstration of layered bed styling, watch Studio McGee’s guide with interior designer Shea McGee:
-
Arrange the sleeping pillows
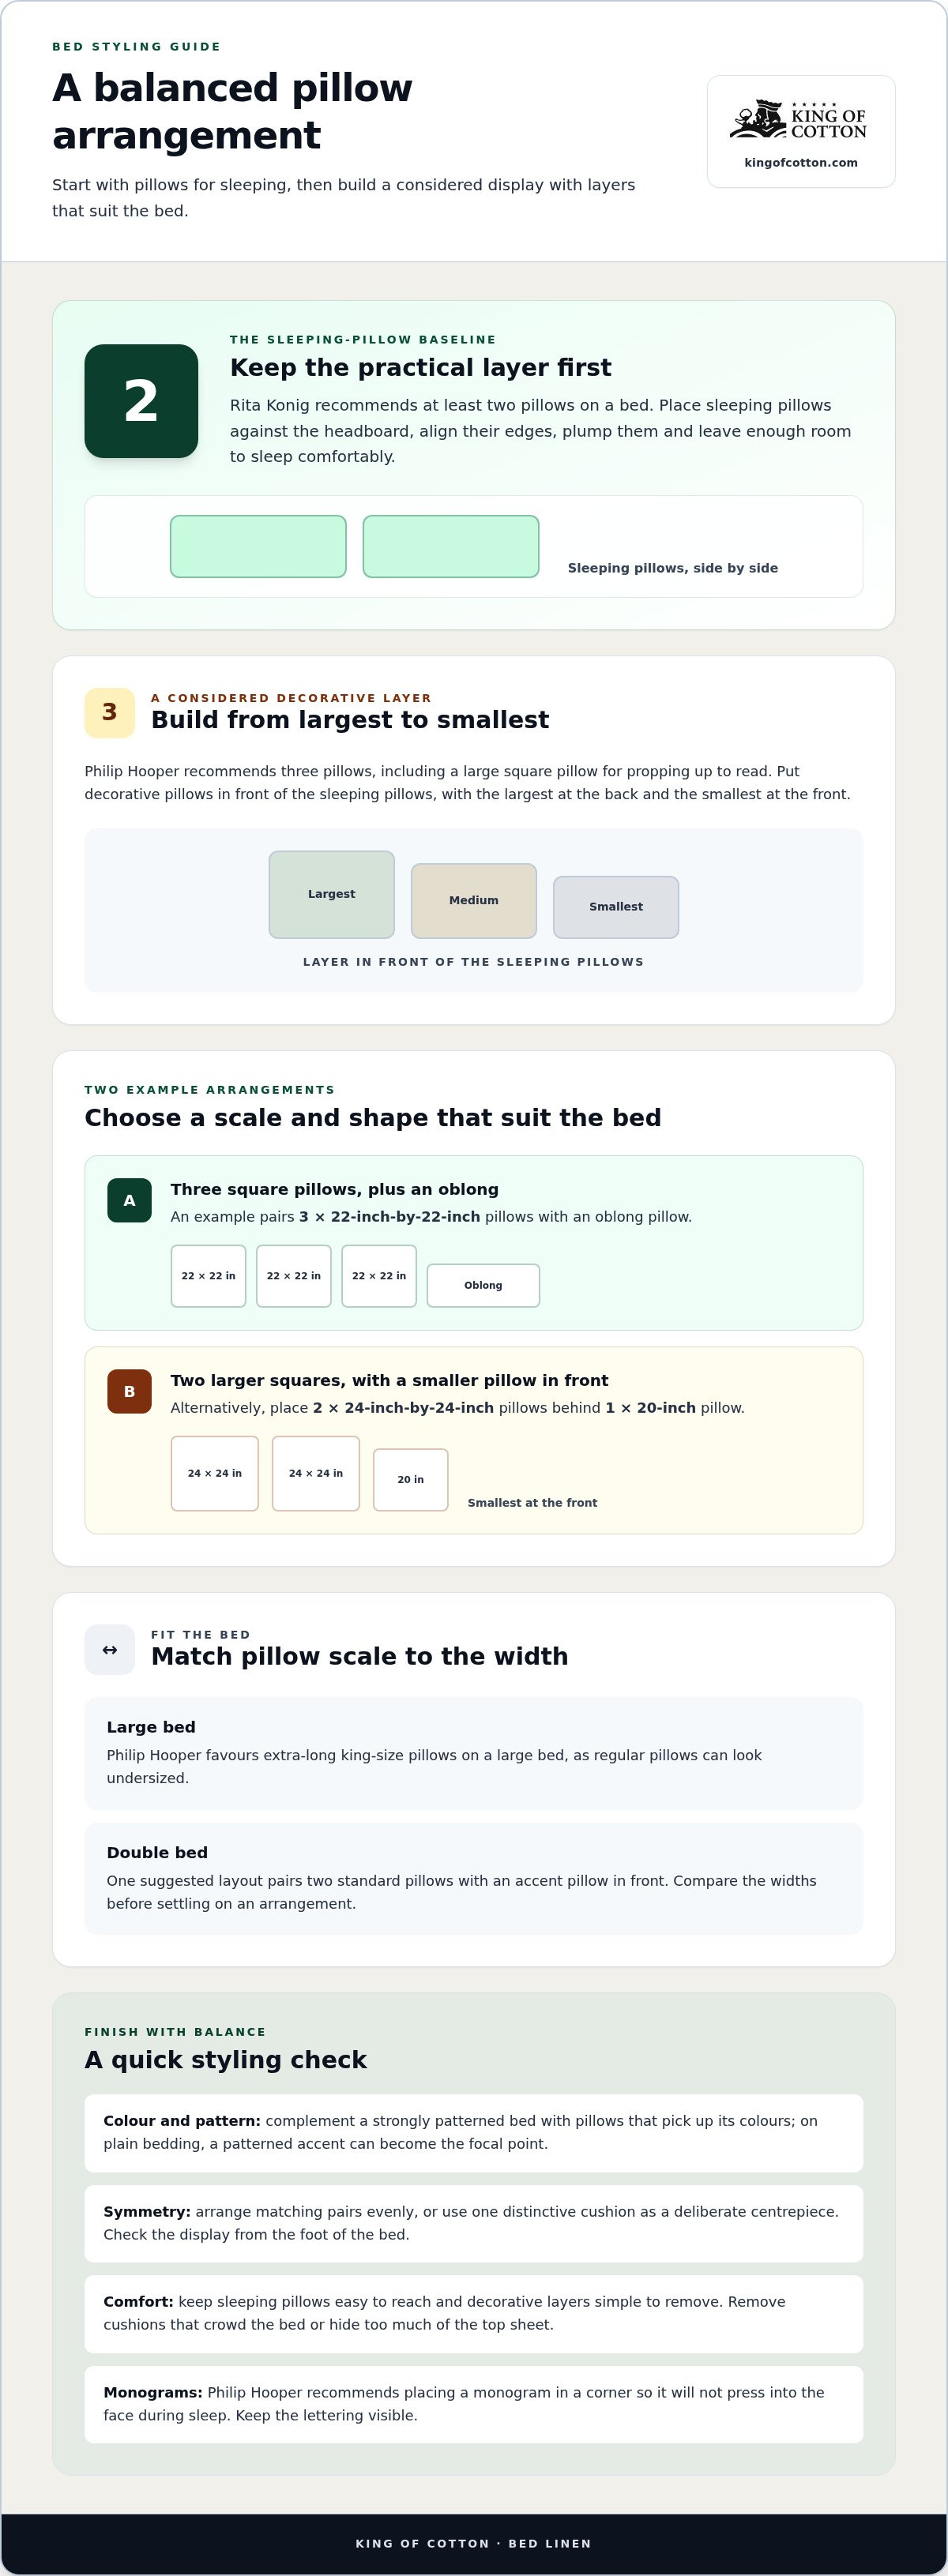
Place the sleeping pillows upright or flat against the headboard, keeping their edges aligned. For a balanced arrangement, Lonika Chande recommends two square pillows at the back, one on each side. Rita Konig also recommends at least two pillows on a bed. Plump each pillow, then lay it flat for a clean, modern finish. Make sure the arrangement leaves enough room for sleeping.
-
Style decorative pillows and accessories
Position decorative pillows in front of the sleeping pillows, largest at the back and smallest towards the front. One arrangement pairs three 22-inch-by-22-inch pillows with an oblong pillow. Alternatively, place two 24-inch-by-24-inch pillows behind a 20-inch pillow. Add a considered accessory, such as a lavender bag for overnight guests, but keep the display easy to remove.
- Choose the number and scale of pillows to suit the bed. Philip Hooper recommends three pillows, including a large square pillow for propping up to read. On a large bed, he favours extra-long king-size pillows because regular pillows can look undersized. For a double bed, one suggested arrangement pairs two standard pillows with an accent pillow in front. Compare the widths before choosing a layout.
- Balance colour and pattern with the top sheet and duvet. If the bedding has a strong pattern, choose decorative pillows that complement its colours rather than compete with it. With plain bedding, a patterned accent pillow can provide a focal point. Arrange matching pairs symmetrically, or use one distinctive cushion as a deliberate centrepiece. Check the display from the foot of the bed.
- Finish each pillow with a quick plump and careful turn. If a pillow has a monogram, Philip Hooper recommends placing it in a corner so it won’t press into the face during sleep. He also describes stacking three monogrammed pillows as a styling option. Keep the lettering visible, and make sure decorative layers don’t obscure the sleeping pillows or make them awkward to move.
- Step back and adjust the spacing. A neat arrangement has even visual weight on both sides, with decorative pillows sitting securely in front. Remove any cushion that hides too much of the top sheet or makes the bed feel crowded. The display should look composed from the doorway, while the sleeping pillows remain easy to reach and use.
Fitting sheets and tucking them with hospital corners
Start with a smooth mattress surface, then secure each layer before adding the next. The right fit and careful tucking help prevent loose fabric and creases.
-
Fit the mattress protector and fitted sheet
Pull the mattress protector’s corners over the mattress as you would with a fitted sheet. Then fit the sheet, starting at the hardest-to-reach corner and leaving the easiest until last. Pull the fabric evenly over each corner, checking that the seams sit at the mattress edges. Smooth the surface with your hands and straighten any twisted fabric before continuing.
-
Tuck the flat sheet into hospital corners
Centre the flat sheet and tuck its foot firmly beneath the mattress before shaping either corner. Lift the side edge about one to two feet from the bed’s end, holding the sheet at a 45-degree angle. Tuck the hanging fabric beneath the mattress, lower the triangular flap, then tuck its edge in neatly. Repeat on the other side and check that both folds look even.
- Keep the sheet tension even as you work around the bed. Pull gently towards the foot before tucking, so the fabric lies flat without straining at the corners. A hospital corner should secure the sheet without creating a tight ridge across the mattress. If a fold looks bulky, lift it and remake it rather than hiding loose fabric beneath another layer.
- To make a bed quickly without creases, smooth each section before moving on. Start in the centre and sweep your hands towards the edges, easing out folds as you go. Fitted sheets can help keep bedding in place, but a poor fit can still wrinkle. Check that the sheet suits the mattress dimensions and depth, then retuck any slack.
- For bed-making hygiene and safety in the UK, use clean, dry bedding and lift with a stable stance. In workplaces, follow the setting’s infection-control and manual-handling procedures. A hospital corner is a finishing technique, not a substitute for good hygiene.
- Avoid common mistakes such as forcing on a sheet that is too small, leaving the protector twisted or tucking before smoothing. These can cause wrinkles, uneven edges and loose corners. Lift the mattress slightly if you need room to secure excess fabric, then check both sides for a consistent finish.
- Finish by running a hand across the top sheet and checking the foot and side edges. For a crisp result, keep the sheet’s upper edge straight and the folds aligned. Choosing well-sized bed linen for a smooth fit supports the neat finish, while careful smoothing removes the small creases that can disrupt it.
Folding a duvet or comforter for a fluffy look
Once the fitted sheet lies smoothly across the mattress, position the duvet evenly. Careful shaping creates a soft, generous finish without burying the bed in layers.
- Spread the duvet or comforter across the mattress, aligning its top edge with the head of the bed. Adjust both sides until an equal amount hangs over each edge. Smooth the surface from the centre outwards, easing folds towards the sides. If a topper changes the mattress depth, check that the duvet still drapes evenly.
- Settle the filling inside its cover before shaping the top. Hold the upper corners and gently shake the duvet, guiding the filling into each corner. Smooth the cover with your palms, then check that the seams sit straight. A twisted cover can bunch the filling and leave one side looking flatter.
- Choose between a duvet and comforter according to the finish you want. A duvet has a separate cover around its insert, while a comforter is a filled covering used as one layer. Either can look polished when spread evenly. Keep the top edge aligned and avoid pulling one side lower than the other.
- Fold the duvet or bedspread back in half at the head of the bed. This leaves space for pillows and creates a defined, layered edge. If you use a top sheet, place it pattern side down beneath the duvet. Turn its upper edge over the duvet so the pattern shows neatly.
- For extra volume, fold a comforter towards the foot of the bed in three sections. This tri-fold leaves room at the head for pillows and gives the lower half a fuller profile. Keep each fold broad and smooth rather than compressing the filling into a narrow strip. Check the folded edge from the foot of the bed.
- One styling approach for a fuller shape is to use two duvet inserts. Arrange them evenly inside the cover so the filling reaches the corners and edges. Shake the covered duvet again, then smooth the top. If the bed already looks bulky, use one insert and create fullness with a neat fold instead.
- Consider filling and proportion when choosing pillows for the finished bed. A down-alternative insert one size larger than its cover can create a fuller decorative shape. Plump the pillows before arranging them, then adjust the duvet’s folded edge to leave enough space at the head. The layers should look balanced together.
- Check the duvet from both sides and the foot of the bed. Straighten the top edge, even the overhang and smooth any visible creases. For a relaxed daytime finish, fold the duvet and bedspread back in half to air the mattress surface. Keep the fold consistent across the width for a composed look.
Layering sheets, duvets, blankets and bedspreads
Gather a fitted sheet, duvet and cover, plus an optional top sheet, blanket, bedspread or throw. No special equipment is needed. Choose layers to suit your preferred warmth and finish.
- Begin with the fitted sheet as a smooth base, then decide whether to add a top sheet. A top sheet provides another layer between you and the duvet. If you prefer a pared-back bed, keep the stack simple: a fitted sheet, duvet and sleeping pillows make daily bed-making quicker.
- Place the top sheet pattern side down, if it has a pattern. The design will show correctly when you turn the upper edge over the duvet. Centre the sheet evenly, leaving enough fabric at the head for a neat fold. Smooth it before adding the duvet.
- Set the duvet over the bed, keeping the overhang even on both sides. This balanced drop helps the bedding look composed from the foot and either side. Check that the duvet cover’s opening and seams sit discreetly, then straighten the top edge before adding another layer.
- Add a blanket when you want extra warmth. Align its top edge with the top of the mattress, then fold the upper section back to leave room for pillows. Without a duvet, use one or two blankets for warmth. Keep the blanket flat so its edges don’t bunch beneath the next layer.
- Place a quilt or bedspread over the duvet or blanket to add texture and depth. A quilt’s stitched surface can contrast with a smooth duvet cover. Fold the upper edge back to show the layers beneath, and keep the fold straight across the bed.
- Style a throw blanket at the foot of the bed as a finishing accent. Lay it horizontally across the lower section for a structured look, or drape it diagonally over one corner for a softer effect. Arrange the fold to reveal the duvet cover or bedspread rather than hiding every layer.
- Coordinate the throw with the bedding and decorative pillows. For example, repeat a colour from a patterned duvet cover in a plain throw, or contrast its texture with smooth sheets. Keep the arrangement restrained: a single throw can define the foot of the bed without competing with the pillows.
- Finish with a final check from the doorway. Straighten the top-sheet fold, align the blanket and bedspread, and make sure the throw sits securely. A tray can complete the look, but leave enough clear space for the bedding to remain the focus.
Using a bed skirt to conceal the bed frame or storage
Measure the bed’s width, length and distance from frame to floor before choosing a skirt. For king and super king beds, match the linen and skirt to the mattress size, then check that the skirt’s drop conceals the frame without dragging.
- Prepare the bed skirt before replacing the mattress. Place it around the bed frame, aligning its edges with the sides and foot. This is easiest with the mattress off, so the skirt can lie flat across the frame rather than bunching beneath the mattress.
- Position the skirt so its fabric falls evenly around the frame. Check the foot first, then compare both sides from the bedroom doorway. If one edge sits higher, adjust the skirt before adding the mattress. A level hem creates a clean outline beneath the bedding.
- Carefully lower the mattress back onto the frame, keeping the skirt in position. Check around the edges that the fabric hasn’t folded underneath. Smooth visible creases downwards, then look from the foot of the bed to confirm the skirt hangs evenly.
- Use the skirt to conceal open space beneath the frame, including visible storage boxes. Keep drawers or containers accessible by moving the fabric aside when needed, then return it to position. Avoid trapping the skirt beneath storage, which can pull the hem out of line.
- Adapt the process for an unusual frame, such as one with a low footboard or awkward corners. Take extra care when lifting the mattress and tucking the skirt or sheets into place. Check that the fabric clears moving parts and doesn’t catch when storage drawers open.
- For a king or super king bed, centre each layer before arranging the edges. Larger bedding can shift as you work, so smooth from the middle towards each side and compare the overhang. Make hospital corners only after centring the sheet, or one side may end up shorter.
- Finish the morning bed-making routine with a visual check of the skirt, sheets and duvet. Straighten any section displaced while arranging the upper layers. If the frame or storage remains visible, adjust the skirt’s position rather than pulling the top bedding down to hide it.
- Choose bed linen that complements the skirt’s colour and the bedroom’s overall palette. A simple skirt can sit quietly beneath patterned bedding, while a tonal match gives the bed a continuous, composed appearance. Explore bed linen to complete your bed styling.
A commenter says a similar layered bed takes 3-4 minutes. For a firm, uniform finish, tuck the flat sheet with hospital corners and measure mattress depth before ordering sheets. Roll a mattress topper onto the mattress, aligning its corners; choose one with a viscoelastic bottom to help prevent slipping at night.
King of Cotton: Bed Linen
King of Cotton offers bed linen, duvets and pillows for creating a considered, layered bed. If you’re refreshing your sheets, replacing a duvet or choosing pillows to complete the arrangement, these bedroom essentials are a natural next step after styling your bed.
Its range also includes towels and bathrobes and gowns, while its products serve individual customers and hospitality businesses. For this article’s bed-making advice, focus on matching your bedding layers to your mattress and preferred finish, then arrange them with the folds and balance described above.
Explore bed linen, duvets and pillows at kingofcotton.com.
Make your bedroom feel considered every day
A beautifully made bed can set the mood for the whole bedroom. Let your preferred colours, textures and level of layering guide your choices, then refine the arrangement as your space or routine changes. Once you know how to make a bed professionally, adapt the finish to create a calm, inviting room rather than follow a fixed formula.
For a coordinated home, King of Cotton offers bed linen alongside towels and bathrobes and gowns. These thoughtful details can bring a consistent sense of comfort from the bedroom into the bathroom, whether you’re refreshing one room or considering a wider update.
If you’d like guidance choosing bedding for your preferred look, contact King of Cotton for bedding advice. Take the next step towards a bedroom that feels beautifully your own.
Frequently Asked Questions
What is the professional step-by-step method for making a bed?
To learn how to make a bed professionally, work from the mattress upwards and prepare each layer before adding the next. Start with a protector and fitted sheet, then add a flat sheet if you want one. Position blankets or a duvet, finish with decorative layers, and arrange the pillows last. View the bed from the doorway to spot uneven edges or a crooked top line.
How should you layer and tuck flat sheets, duvets and blankets?
Place a flat sheet between the fitted sheet and duvet, then fold its upper edge over the duvet cover. Add a blanket when you want extra warmth, keeping its edge aligned with the mattress top. Without a duvet, one or two blankets can provide warmth. Choose layers that suit the room and season, and remove any that make the bed cumbersome to use.
How do hotels make hospital corners on a bed?
A hospital corner secures the sheet at the foot, then uses a triangular side fold to tuck loose fabric beneath the mattress. Lower the triangle and tuck it in to create a clean diagonal crease. Repeat on the opposite side. Keep both folds similar, but don’t pull so tightly that the sheet strains or shifts when someone gets into bed.
How do you arrange pillows and cushions for a professional finish?
If you’re practising how to make a bed professionally, place sleeping pillows within easy reach, then arrange decorative cushions in front, with larger shapes behind smaller ones. A large square pillow can provide support for reading. Keep the display proportionate to the bed, and remove cushions that crowd the headboard or hide too much bedding. Move decorative pillows aside before sleep so the sleeping pillows remain accessible.